Fixing the Basement Walls - Part I
And we're back at it! After the last post, we kinda took a break which ended up extending through the holidays, so I don't think a single thing has really been done since October! Be that as it may - it's time to get back at it! Before I do though, I really hope everyone had a safe and happy holiday season!
Okay, so here's the back story...A neighbor's grandfather built all the houses in the neighborhood, so I have a pretty good link to the history of ol' 173. Turns out that when 173 was built way back in 1927 or '28 (I always forget which) the builder used river water from the Hudson to mix the concrete. Now, in my limited knowledge of such things, I would never have thought something like that would matter. Turns out it does. Apparently, the bacteria in the water has, over the years, caused problems with the poured concrete foundations in the neighborhood. 173 is no exception. A couple years ago the foundation began to start flaking a little here and there. Nothing alarming, just a little bit. Over the last year or so, after learning of this issue from my neighbor, I noticed that it was happening a little more, and spreading a good bit.
It hasn't gotten terribly bad, but I figured I better get on it before 173 ends up needing a new foundation. how's that for worst case scenario? So this weekend I decided it was time to start. Before you look at the first picture (I know...you already looked - you probably read the last page of a novel first too!), remember that the basement at 173 is a working basement. It is combination laundry room, workshop, storage and sometime gym.
I don't pity any man who does hard work worth doing. I admire him. I pity the creature who does not work, at whichever end of the social scale he may regard himself as being. - Theodore Roosevelt
Okay, so here's the back story...A neighbor's grandfather built all the houses in the neighborhood, so I have a pretty good link to the history of ol' 173. Turns out that when 173 was built way back in 1927 or '28 (I always forget which) the builder used river water from the Hudson to mix the concrete. Now, in my limited knowledge of such things, I would never have thought something like that would matter. Turns out it does. Apparently, the bacteria in the water has, over the years, caused problems with the poured concrete foundations in the neighborhood. 173 is no exception. A couple years ago the foundation began to start flaking a little here and there. Nothing alarming, just a little bit. Over the last year or so, after learning of this issue from my neighbor, I noticed that it was happening a little more, and spreading a good bit.
It hasn't gotten terribly bad, but I figured I better get on it before 173 ends up needing a new foundation. how's that for worst case scenario? So this weekend I decided it was time to start. Before you look at the first picture (I know...you already looked - you probably read the last page of a novel first too!), remember that the basement at 173 is a working basement. It is combination laundry room, workshop, storage and sometime gym.
See that area under the bikes? That's a good example of what's happening. Actually, that wall is probably in the best shape. I decided to start there so I could get a little practice and at least a basic idea of what to do before I get to the more complex stuff. Here's a little closer look:
To get started I had to move a bunch of stuff away from the wall...basement stuff you know...so it's all crammed in the middle of the basement now because there's really nowhere else to put it all. Anyway, I used my trowel to knock off all the loose concrete. By-the-way, if you're ever going to do this - wear a mask! It's a terribly dusty job! After knocking all the loose stuff off, which was a lot, I took my wire brush to it all to get all the finer stuff off. This process is a little nerve racking because you need to get all the loose concrete off, and sometimes it seems as though you're gonna go all the way through the wall. The fact is, the deepest I had to go was about one centimeter. Just a bit of a panicker at times I guess! After wire brushing I vacuumed like crazy, then sponged it all down to remove as much dust as possible.
My cousin is a brick mason and does a lot of concrete work too, so I have a great resource for how to do this project right! One of the things he said to do was, after cleaning the wall, was to apply a bonding agent. I went with Quickcrete Concrete Bonding Adhesive. The instructions said to apply a 2 part water, 1 part adhesive mixture and let dry for two to three hours. I did that, and when it dried it wasn't at all tacky. So I called my cousin...he said apply it straight, I did - and it was nice and tacky when it was time for the cement to go on.
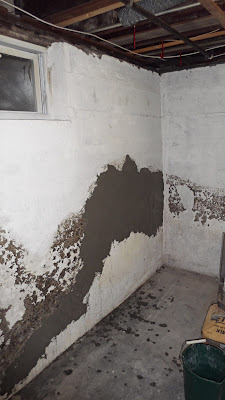
Then it was time to apply the cement. Again, I went with Quickcrete Quick-Setting cement. Here's a shot of the day one progress.
That's about as far as I got on day one because I ran out of cement. Next up - you guessed it - day two!


