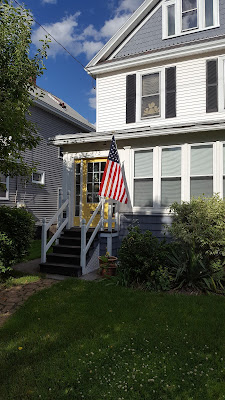
Front Stoop Railings Finished!
Getting Close
Okay, just a couple touch-ups to do but I probably won't get back to posting about the front stoop again (other projects to move on to as time permits), so I'm posting just a tad early because I actually have a few minutes tonight.
Picking Back Up
We left off with the dismantling of the old railings, and the prepwork - including wood filler, priming and painting prior to putting (holy cats that's a lotta P's!) the new railings together. Now I'll show a little of the progression. I showed you some of the painting:
Because the lower rails would be 2x4, I started the top rail with a 2x3, topped by a 1x4 which I re-sawed to the width I wanted, then routed the edges. On the sides I applied trim moulding for that bit of dimension I was talking about. Once assembled this is what they looked like:
I painted the moulding Valspar's Elephant Gray
...which is one of the primary colors here at 173. To get a touch of black involved, I painted the bands on the posts with Sherwin-Williams High Gloss Black:
Just clamped on a board left over from some long-forgotten project, scribed a line, and cut it on the chop saw!
Oh, and let me take a moment to tell you about the saw! That saw is just a basic chop saw, nothing fancy about it. But, because I'm so terrible at angles, I searched for, and found this awesome little gadget:
What a difference! Perfect alignment made my angled cuts spot-on! By-the-way, nobody paid me to say that, but if they'd like to....! Anyway, I digress. Once all the angles were figured, and cuts made, it was a matter of assembly. I decided to go with 3 rails to match the back stoop, but this time, I chamferred the board to provide for rain runoff (the things you learn on YouTube!).
Using Kreg jigs and screws, trim screws and GRK structural screws (another product I loved!), the whole thing came together:
Then it was a matter of caulking, filling holes and sanding...
Followed by more painting (did I ever tell you I hate painting?), 'til it ended up looking like:
But, I had an idea a few weeks back, just one of those final touches I thought would add that little something extra:
Little solar lights! O vanity of vanities - I love the look!
Before I wrap up this post, let's have a quick look at the front stoop evolution...
Early '70s:
1990's:
Late '90s:
Early 2000's:
2016:
And now:
All that's left is a little paint touch-up, but other than that, there's the story of the new front stoop railings!
Handrail Anatomy
Bear with me a second. What I wanted to do was incorporate all the primary colors of the house (not including the yellow doors) to give a little interest and dimension to the stoop. Here's what I did:
Because the lower rails would be 2x4, I started the top rail with a 2x3, topped by a 1x4 which I re-sawed to the width I wanted, then routed the edges. On the sides I applied trim moulding for that bit of dimension I was talking about. Once assembled this is what they looked like:
I painted the moulding Valspar's Elephant Gray
...which is one of the primary colors here at 173. To get a touch of black involved, I painted the bands on the posts with Sherwin-Williams High Gloss Black:
Assembly Time
I'm not generally a fan of high gloss paint, but I picked this up at Lowes on the "mis-mix" shelf for about two bucks - who can pass that up? After what turned out to be weeks of prep, it was time to put it all together. Now, one would think that with all the prep, pre-cutting, etc, that assembly would be a cinch. Well, one would be wrong! You know, I did okay in high school geometry, and I watched numerous videos about figuring angles in construction, but in the end - I went with the most obvious approach:
Just clamped on a board left over from some long-forgotten project, scribed a line, and cut it on the chop saw!
Oh, and let me take a moment to tell you about the saw! That saw is just a basic chop saw, nothing fancy about it. But, because I'm so terrible at angles, I searched for, and found this awesome little gadget:
What a difference! Perfect alignment made my angled cuts spot-on! By-the-way, nobody paid me to say that, but if they'd like to....! Anyway, I digress. Once all the angles were figured, and cuts made, it was a matter of assembly. I decided to go with 3 rails to match the back stoop, but this time, I chamferred the board to provide for rain runoff (the things you learn on YouTube!).
Using Kreg jigs and screws, trim screws and GRK structural screws (another product I loved!), the whole thing came together:
Then it was a matter of caulking, filling holes and sanding...
Followed by more painting (did I ever tell you I hate painting?), 'til it ended up looking like:
But, I had an idea a few weeks back, just one of those final touches I thought would add that little something extra:
Little solar lights! O vanity of vanities - I love the look!
Before I wrap up this post, let's have a quick look at the front stoop evolution...
Early '70s:
1990's:
Late '90s:
Early 2000's:
2016:
And now:
All that's left is a little paint touch-up, but other than that, there's the story of the new front stoop railings!


